Asus Router Access Point Setup Tutorial
Learn how to easily configure your Asus router as a powerful access point to extend your wireless network coverage and eliminate dead zones!
Why Set Up an Access Point?
Setting up an access point is an ideal solution if you want to extend your WiFi coverage or connect multiple devices efficiently. With an access point setup, you can bridge the wireless signal between different areas of your home or office, ensuring a stable and high-speed connection in every corner of your space.
Understanding Asus Router Configuration for Access Point Mode
Before you start setting up your Asus router as an access point, you need to check if it supports access point (AP) mode. The primary router or modem needs to enable the IP Sharing (DHCP) feature. In this mode, the firewall, IP sharing, and NAT functions are disabled by default. The Ethernet RJ45 cables that will be used to connect the network devices should not exceed 100 feet.
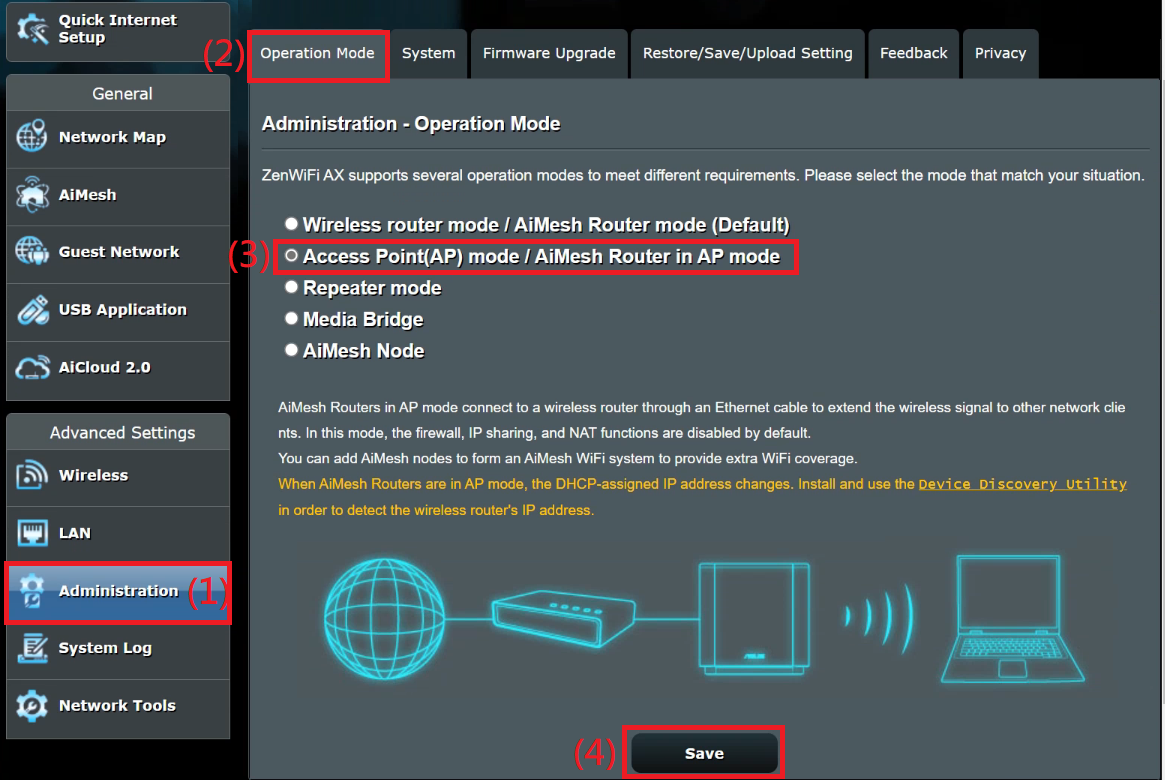
Step-by-Step Asus Router Access Point Setup Tutorial
Connect a computer to the Asus router and launch a web browser. Open a new tab and type the router's IP address in the address bar (e.g., http://192.168.1.1). Press Enter to proceed.
Log in to the router using the admin username and password. The default credentials can be found on the underside of the router or in the user manual.
Click on the Advanced Settings option and navigate to the Wireless Settings section.
Select the access point mode from the drop-down menu. This will allow you to configure the router as an access point.
Configure the network name (SSID) and password for your new access point. Make sure you use a strong and unique password.
Save the changes and disconnect the Ethernet cable that connects the Asus router to the computer.
Now, you can use the router as a wireless access point on your home network.
Configuring the Access Point Mode on Your Asus Router
To configure your Asus router as an access point, follow these steps:
- Connect a computer to the router and launch a web browser.
- Log in to the router using the admin username and password.
- Click on the Advanced Settings option and navigate to the Wireless Settings section.
- Select the access point mode from the drop-down menu.
- Configure the network name (SSID) and password for your new access point.
- Save the changes and restart the router.
Common Issues and Solutions
Here are some common issues you might encounter when setting up your Asus router as an access point:
- Failure to access the router's settings page (WebGUI): Check if the router is linked to the parent router. If not, restore the router to the factory default status and set up.
- IP address issues: Make sure the IP address is set correctly on the router and the connected devices.
- Wireless connectivity issues: Check the wireless settings on the router and the connected devices to ensure they are set correctly.
Conclusion
Setting up your Asus router as an access point is a straightforward process that can significantly improve your wireless network coverage and eliminate dead zones. By following the steps outlined in this tutorial, you can easily configure your Asus router as a powerful access point and enjoy a stable and high-speed connection in every corner of your space.
![[Wireless Router] How to set up access point (AP) mode? - ASUS](https://i.ytimg.com/vi/gbTE1YK1mMQ/maxresdefault.jpg "[Wireless Router] How to set up access point (AP) mode? - ASUS")


![[Wireless Router] How do I enter my ASUS router's setting page using ...](https://www.mywifiservice.com/content/images/WiFi_Network/InfoPortal_InfoPoint_1.png "[Wireless Router] How do I enter my ASUS router's setting page using ...")


![[Windows 11/10] Troubleshooting - Wireless Network (Wi-Fi) Issues - ASUS](https://www.wilfridwong.com/wp-content/uploads/2023/06/IMG_2539-scaled.jpg "[Windows 11/10] Troubleshooting - Wireless Network (Wi-Fi) Issues - ASUS")
