Access Point Mode On Netgear Router: A Comprehensive Guide
Are you looking to expand your wireless network coverage or improve signal quality in a specific area? Setting up your Netgear router as an access point (AP) can be a great solution. In this article, we will show you how to set up your Netgear device in AP mode and provide you with a comprehensive guide on the benefits and requirements of using this mode.
What is Access Point (AP) Mode on Netgear Router?
AP mode allows your Netgear router to act as a gateway for other devices on your network, providing internet access while acting as a bridge between your existing router and the devices that need to connect to the internet. This mode is ideal for creating a dedicated wireless network or extending your current network to cover a larger area.
Benefits of Using Access Point Mode on Netgear Router
- Improved Network Coverage: Setting up your Netgear router in AP mode can help extend your wireless network coverage, reaching areas where your primary router's signal is weak.
- Enhanced Signal Quality: By using AP mode, you can improve the signal quality of your network, reducing the likelihood of dropped connections or interference from other devices.
- Simple Setup: Configuring your Netgear router in AP mode is a straightforward process that can be completed in a few minutes.
Requirements for Access Point Mode on Netgear Router
To use AP mode on your Netgear router, you will need to meet the following requirements:
- Existing Router or Gateway: You will need an existing router or gateway that supports wireless connectivity to connect to your Netgear router in AP mode.
- Hardware Compatibility: Verify that your Netgear router and the existing router or gateway are compatible with each other's hardware and firmware versions.
- Software Updates: Make sure that your Netgear router's firmware is up-to-date, as newer versions may offer improved features and performance.
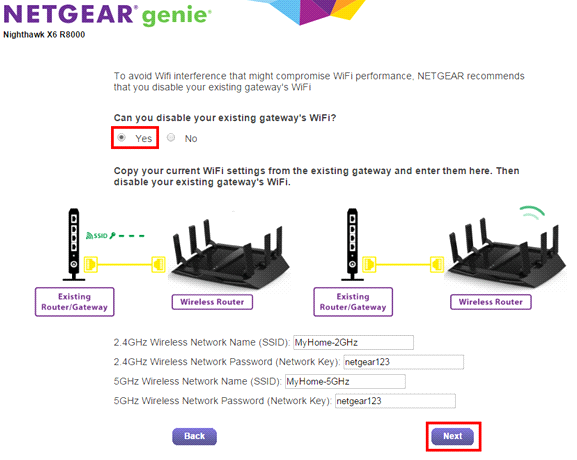
Step-by-Step Guide to Setting Up Access Point Mode on Netgear Router
Follow these steps to set up your Netgear router in AP mode:
- Connect a computer to one of the LAN (not WAN) Ethernet ports at the back of the router.
- Access the router menu by opening a web browser and typing in the address bar http://www.routerlogin.com.
- Log in using the default username and password (admin and password). If you have changed the password, use the new password instead.
- Click on ADVANCED > Advanced Setup > Wireless Settings.
- Scroll down to the AP Mode section and select Enable AP Mode.
- Click Apply to save the changes.
- Connect your Netgear router to your main network using another Ethernet cable, connecting it to one of the LAN ports of the main router.
Troubleshooting Tips
If you encounter any issues while setting up your Netgear router in AP mode, try the following troubleshooting tips:
- Restart the Router: Sometimes, a simple reboot can resolve connectivity issues.
- Update Firmware: Ensure that your Netgear router's firmware is up-to-date, as newer versions may offer improved features and performance.
- Check Network Settings: Verify that your existing router or gateway's network settings are correctly configured.
Conclusion
Setting up your Netgear router in Access Point (AP) mode can help improve your network's coverage, signal quality, and overall performance. By following the step-by-step guide outlined in this article, you can easily configure your Netgear device to act as a gateway for other devices on your network. If you encounter any issues, refer to the troubleshooting tips provided above to resolve the problem.

 - YouTube")


")
- 3x1G Ports, Easy Setup, Security ...")


